Over the last couple of weeks I have been putting a lot of thought into creating a “brand” to represent my blog. Once I decided on the image I wanted to portray, it was time to figure out how to put my plan into action. I’ve done a lot of research and tried and tested many different formats and I thought I would share some of these tips on how to create a custom Facebook fan page. Here, I’ll be discussion the profile image and landing page. First, let’s start with the basics of creating the image…
I often use a program called Microsoft Digital Image Suite, but you could use just about any image/graphics editor like Photoshop. There are some free programs out there and if you’re tech savvy I recommend downloading Gimp (comparable to Photoshop). For simplicity and convenience though, an online editing program like Plixr can really helpful, so that’s what I will be using for this tutorial. Ok…now back to the customizing…
Free online image editing? To keep it simple for for those who don’t own designing software, I’m using free programs that you can use online and without memberships. To begin creating your image, you’ll want to go to Pixlr.com and open the image editor. Start with either importing your background image (if you have one) or by selecting “Create a new image“. A box will pop-up asking you to create an image name and set the image size (details below). Once you’ve filled that in, it’s time to start making your image. Work in layers adding your background color or background image first, then graphics or images and finally text. Selecting Layer, Open image as layer will allow you to insert new images, buttons and more onto your background. Use the “Layers” panel in the right side of the screen to move between layers and edit your image without hassles.
Once you’re done with your profile image you’ll most likely want to save it in a format that allows you to edit the layers in the future. Use Pixlr’s pxd format to save a template-style image that can be edited again and again. Then save a second image in jpg format. This flattened version is the one that you’ll want to upload to Facebook. One really great thing about Pixlr is you have several options to either save your images to your computer, in their online library or share them instantly on Facebook, Flickr and Picasa. Blogger tip: If you choose to save your images to a Picasa Web album, you can also upload them through your Blogger posts (click the insert image icon…then select From Picasa Web Albums). Note:If you find your having trouble getting the best resolution for your image, try saving it in another format.
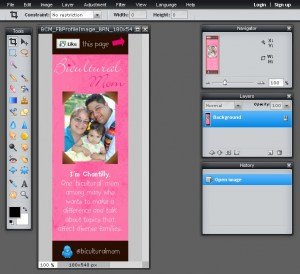
THE PROFILE IMAGE:
Your profile image should be no larger than 180 px wide by 540 px high. Facebook had previously allowed images 200 px by 600 px, but the size was reduced in the new profiles. Upload and then select the “Edit Thumbnail” option under your image to correctly choose your profile thumbnail image. Now you’re done! Notes: If you choose to use a larger image, Facebook will automatically resize your image which could cause potential problems in image quality. Another note, using reddish tones can sometimes cause image quality to look degraded when uploaded to Facebook. I found that saving in tifformat helped to lessen this issue…not sure if that will work for everyone, but I suppose if you’re set on reds or dark pinks (like me)…it’s worth a try. =)

THE LANDING PAGE:
Your landing page should be exactly 520 px wide and the height is completely up to you (variable). I recommend making your landing page height 600 px so that visitors don’t have to scroll to see the full image, but mine requires scrolling and if you need more space, don’t feel bad about expanding the height of your image. If you play it right, you can create the two images in a way that they line up with each other and work together to tell as story. I chose to make my images independent of each other, but each person should find the style that represents their page best. Don’t be afraid to get creative! If you’d like to put social icons on your landing page, you can check out Iconspedia or search google to find the perfect icons (there is an icon option in the left sidebar). Some icons have background coloring, so be sure to test them out on your image and make sure they have translucent backgrounds or that they at least match. Here is another great library of icons from InfoBarrel for those looking for something a bit different.

Once you’ve created your landing page image you may decide that you want to add links to your buttons, images or text. There’s an easy answer and it’s much simpler than you think…no coding involved! Take yourself on over to Image-Maps and either upload your image or select it from the web (if hosted on Photobucket or another photo sharing website). Select the “Start Mapping Your Image” button and once uploaded, you will have the option to “map” the sources for your links (essentially, you’re creating live “buttons”). Use the “rectangle” or “custom shape” tools to select the area where your button or link will be located. Enter and save the link codes.

When you’re finished, don’t forget to check the “Use CSS for Facebook” box! Finally, click the “Get Your Code“button. On the next page you’ll want to select the “CSS Code” tab. Just copy the code and save it in a code editor or Wordpad while you complete this last step. Once you’ve finished, you don’t have to worry about hosting your image because Image-Maps does that part for you.
Ok, on to the final step of adding your landing page to Facebook. Login to Facebook and search for the page Static FBML. This is the application that will allow you to add your CSS code page to your fan page. Below the profile image on the Static FBML page, click the “Add to my page” link. Then click “close”.

Now go to your fan page. You’ll see that a new tab titled “FBML 1” shows up. At the top of your page, just under your page title…click “Edit Info“. All your page options should come up with a list of settings. Click “Apps“. Find “Static FBML” and click “Edit Settings“. A box will pop-up. Click “add” and then close the box. Next find “Static FBML” again and click “Go to App“. This link will bring you to the place where you can enter your CSS code and a “box title”, then click “save“. Most often landing pages are named “Welcome”, but you can make the name anything you want. This is the title that will show up on your landing page tab on your profile, so just realize that everyone will be able to see it. Note: below this code box there is a link to add another FBML box. This allows you to add more custom tabs in the future.

Finally, to make sure that all new visitors are directed to your new landing page, you can set it as your default tab. Here’s how…again, go to the “Edit Info” link at the top of your fan page. Click “Manage Permissions“. You’ll notice an option that reads “Default Landing Tab“…from the drop down menu, select your new tab (the name you created) and click “Save Changes“.

That’s it! For busy blogging moms (and dads) a step-by-step guide and one stop resource can sure save a lot of time and I hope I’ve helped in that respect. If you have any questions or comments feel free to post them here. =)
 Quick & dirty tips to help you improve your website's overall look and performance, increase traffic and get more quality leads online.
This is great! I was just on your facebook page, trying to find out how I could make a landing page of my own. :) This was such an easy tutorial, I can't wait to try it out! :) Thanks!
Thanks Gabie! Let me know if you come across any problems. =)